sandeepk

Journaling is a great way to keep track of your progress and emotional state, using the same journaling principle in managing your finance can be of great help to see how money flow in & out of your life :).

So, here we will explore how to journal in Emacs or any editor of your choice with the help of the tool ledger.

Before starting, let's get familiar with the basic terminologies.

  • Assets – It's the money that you have.
  • Liabilities – It's the money that you own, or you can say Debt.

Ledger is the double-entry accounting software, which means that you have to mention the flow in of the money[where from it comes like Saving account, Credit Card] and flows out of the money[expenditure, Investment, shopping] and all these entries should balance out each other and result should be zero if it's not the case there is an issue in your entries. The best part of the ledger software is that it allows you to manage your data in a simple text file and don't alter your data, and you have all your data with you.

So, Ledger read the simple text file and generate all kinds of the report that you need. Emacs comes in the picture to manage these text file and give a solid way to manage these file with org-mode also, that we will discuss some other time.

Now get ready to set up the journal system.

Installing the Tools

  • Download the Ledger on your system based on your OS from here — for the lazy ones on Ubuntu OS, you can follow the steps given below.
$ sudo add-apt-repository ppa:mbudde/ledger
$ sudo apt-get update
$ sudo apt-get install ledger
  • Open your Emacs editor and then follow these steps.

    • Press Alt-X package-install [Enter Key]
    • Type ledger-mode [Enter Key], this will install the ledger-mode package
    • Open your Emacs config file and paste this snippet. We are telling the ledger-mode to activate for the file extension of .dat file.

      (use-package ledger-mode
           :ensure t
           :init
           (setq ledger-clear-whole-transactions 1)
      
           :mode "\\.dat\\'")
      

Ledger Mode in Action

  • Create a file with the extension .dat and open it in Emacs.
  • Press Ctrl-C Ctrl-A to enter an entry in the file.
    • This will ask for the date for the entry, afterward press enter.
    • Give a nice heading to your Ledger entry and add your expense.

Ledger entry example – It's up to you how you want to maintain your journal, Some entries example to sort out your expenses.

Ledger entry example 
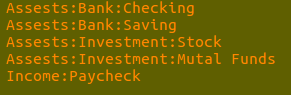
– You can also plan your budget in the ledger and can automate the transaction, if you are geeky enough you can write a code to read the spreadsheet shared by your bank to populate the ledger. – Ctrl-C Ctrl-O Ctrl-R for report generation, you can find more about reports here

#100DaysToOffload #financial-freedom #emacs

—date: 2019-07-08 originally posted here

Identity & Access Management let the user manage access control/policies to the resources by defining who(identity) and what they can access(roles). Today we will talk about the Google Cloud Identity & Access Management and understand what it is and How to use it.

Policy in IAM is composed of the binding list which binds the Member Identity and Roles together to limit the access on google cloud resources.

Member can be of the following type

  • Google Account: This can be any valid Google account with gmail.com or with any other domain name.
  • Service Account: Account related to the application rather than an individual, you can have as many numbers of service account for the logical components of your application.
  • Google Group: Google group are the collection of the different Google account and service account. Every group has a unique email id which can be used to identify members in the IAM policy. The benefit of group account is that if you want to change the permission of user you can simply move the user from one group to another group rather than changing the permission of the users.
  • G Suited domain: Is the virtual group of all the account created in the organization Suite.

Roles on other hand is collection of permission which is mainly represented as .., for example pubsub.subscriptions.consume. Permission determines what type of operation can be performed on resources. Permission cannot be directly applied to resources instead you can assign roles which are a group of different permission.

In Google Cloud Platform Roles are of three kinds

  • Primitive Roles
  • Predefined Roles
  • Custom Roles

Primitive Roles

These are of three types Owner, Editor and Viewer as the name suggest.

  • Viewer has only access to view the resources and data.
  • Editor has Viewer permission + permission to change/edit the resources.
  • Owner has the permission of editor + permission to manage all resources and user.

Predefined Roles

These are the roles provides by Cloud IAM in addition to primitive roles which provide more granular level access to the resources and these primitive roles differ based on different resources in the cloud, you can check these roles over here

Custom Roles

Cloud IAM let the user define different custom roles if primitive and predefined roles do not fulfill their requirements. Though there is some pointer to remember while creating the custom roles. Custom roles can be defined on Organization and Project level but not on Folder level and custom roles should have an iam.roles.creator

So now the question is how these rules actually work as we know that policy is the binding list which binds the member and roles. These policies are connected to resources and are enforce access control when these resources are accessed.

Google Cloud Policy have a hierarchy Organization > Folder > Project > Resources, every resource has exactly one parent and inherit the policy from its parent. Any policy assign on the parent is applied to all its child's. Here is the diagram from Google Cloud IAM docs which show how this hierarchy looks.


Here an example from official docs how permission hierarchy works,

In the diagram above, topic_a is a Cloud Pub/Sub resource that lives under the project example-prod. If you grant the Editor role to micah@gmail.com for example-prod, and grant the Publisher role to song@gmail.com for topic_a, you effectively grant the Editor role for topic_a to micah@gmail.com and the Publisher role to song@gmail.com.

So here my effort to explain Google IAM policy in simple words, Hope you find it usefully. Please do share any feedback or any topic you think I should cover in this post. Till then Happy Clouding :)

Refernces:

-date: 2019-05-22

Let says you are working on a project and you have dependencies of code from some another repository, which you need in your project code.

  • One way is to copy the code from another repository manually to yours whenever it gets update not so good way :sad:
  • Another way is to use git version control system to do that for you and it's super easy to do :smile:

Let me show you how we can do it.

Fetching from Another Repository

git add remote other <repository_link>
git fetch other
git checkout <your_target_branch>
git checkout -p other/target-branch file_path

If you have multiple files you have to just change the last checkout statement to

git checkout other/target-branch file_path1 file_path2

But wait there is one catch here that is the path of the file in your repository should be a mirror image (same as) of the path of the file in another repository you are fetching from.

Fetching from Same Repository

Now If you want to fetch files from another branch of the same repository you have to just do

git checkout other_branch_name file_path1 file_path2

I have to admit that it has been three years now working with git, but it still excites me that there is a lot of things that I do not know about git, If you also have some important time-saving git commands which you feel can save someone else time to share in comment because sharing is caring :sunglasses: .

Cheers!

Happy Coding

-date: 2019-05-19

As part of my job, I have to scrape some website to help our sales team with data on the market, as of now they were doing it manually which is a bit of tedious job to do and consumes a lot of their productive time. So on bit searching and going through different tools and framework came across a framework named Scrapy. So here I am going to share how to set up and use Scrapy.

Scrapy is a free and open source web-crawling framework written in python which is used to extract data from a website without much of hassle. They have a very nice documentation you can check out here.

Steps to Install Scrapy

sudo apt-get install python-dev python-pip libxml2-dev libxslt1-dev zlib1g-dev libffi-dev libssl-dev pip install Scrapy

Steps to Create New Project

To create a Scrapy project type this command in your terminal.scrapy start project <project name>. Project structure will look like this

Now go ahead and create a python file at path /spiders and paste below code.

#!/usr/bin/env python3
import scrapy

class RedditSpider(scrapy.Spider):
    # name of the scrapper, it should be unique.
    name = "reddit"
    # list of the URL need to be iterated.
    start\_urls = \['https://www.reddit.com/'\]

    # Called to do any operation on the response of the above URL.
    def parse(self, response):
       # css selector of the anchor tag which contains the headers
       top\_post = response.css("a.SQnoC3ObvgnGjWt90zD9Z")
       for post in top\_post:
           self.log(post.css('::text').extract\_first())

To start scrapping, type

`scrapy crawl reddit`

Here we are scrapping the Reddit website for the latest post and getting the header of all the post. The output of the above code will look like this.

  • Trump Organization ‘Sold Property to Shell Company Linked to Maduro Regime,’ Says Report
  • Blind people of Reddit, what do you find sexually attractive?
  • A “caravan” of Americans is crossing the Canadian border to get affordable medical care
  • A “caravan” of Americans is crossing the Canadian border to get affordable medical care
  • [Post Game Thread] The Houston Rockets defeat the Golden State Warriors, 112-108, behind Harden's 38 points to level the series 2-2, despite the continued brilliance of Kevin Durant 18, my friend here is failing biology and thinks she's unroastable. Go for it guys, and go hard If you strike me down, I shall become more powerful than you can possibly imagine. [BOTW]
  • ELI5: Why are all economies expected to “grow”? Why is an equilibrium bad?
    ....

Now the best part of Scrapy is if you want to experiment around any website before creating any project you can easily do that.

scrapy shell 'https://www.reddit.com/'

And then can try a different CSS selector on the response. Though there is a lot more you can do with Scrapy like saving the result in JSON, CSV format and even integrate with Django project might show that in next post, till then goodbye.

Cheers

—date: 2019-10-03 originally posted here

Generators is a function in which objects are created at once but not all code is executed at once as done in normal function. In normal function execution from top to the return statement. A function that consists of a yield statement is called a generator's function. The execution of the generator function happens differently, in which the code execution stops at the yield statement rather than a return statement, to move to the next statement next() method is called which will start the execution of the code from where it is left over. If no yield statement is found a StopIteration exception is raised.

So let's see how to create, execute a Generators in python.

def fib(n):
    a, b = 0, 1
    while a <= n:
        yield a   # yield statement.
        a, b = b, a + b

Now let execute the method fib().

fib_fun = fib(10)
next(fib_fun) # 0
next(fib_fun) # 1
next(fib_fun) # 1
.
.
.
next(fib_fun) # 8
next(fib_fun) # reached the end will raise StopIteration Error.
Traceback (most recent call last):
File "<stdin>", line 1, in <module>
StopIteration

Else you can use for loop which call next() in the background.

for fib\_value in fib(10):
    print(fib)

# Output
0
1
1
2
3
5
8

So here we today understand the Generators concept in python. Now you would be thinking where we can use this, let me state some use cases.

  • Can be used for memory management, where we pass the whole list at once, we can use Generator to pass data one by one so that less load comes on memory.
  • Generator can be used to define infinite streams.

If you know any more use case, please do share in the comments and if want to share something else or talk about Generators feel free to ping me on twitter

Till then Cheers :)
Happy Digging.

—date:2019-09-19 originally posted here

Today we will talk about Closure a functional object in Python.

Closure is a function object which has access to the local variables/free variables of the enclosing scope and can be executed outside its scope. Nested function is a Closure function if

  • It can access variables that are local to enclosing scope.
  • It can be executed outside for its scope.

Closure can be used for one of these

  • Replacing the hard coded constants.
  • Eliminating global.
  • Can be used for data hiding and many other things.

So lets see with a code snippet to see how closure and nested function are different from each other.

# nested functions 
def inc_x(x):  
    def add_10(x=x):
        print("{0} is increased by 10 = {1}".format(x, x+10)) 
    return add_10()  # remember about the parenthesis.
  
inc_value = inc_x(10)
inc_value  #Output: 10 is increased by 10 = 20

So the above function will be called a Nested function, not a Closure because

  • Inner function [add10] doesn't access the local variable of enclosing function incx. It used the value of X rather than using a reference.
  • Inner function [add10] cannot be executed outside the scope of incx.

Now let see the Closure function example.

# closure functions 
def inc_x(x):  
    def add_10(): 
        print("{0} is increased by 10 = {1}".format(x, x+10)) 
    return add_10 # returning function without parenthesis, passing only references.

inc_value = inc_x(10)
# We are able to execute the inner function outside its scope.
inc_value() 
#Output: 10 is increased by 10 = 20

So above code will be called as Closure function rather than Nested function because

  • add10 function is accessing the local variable of the incx function. Here a reference to the local variable of incx is maintained in the add10.
  • add10 can even be executed outside the body/scope of incx function.

Closure in python is created by a function call, here every time incx is called a new instance of this function is created. So whenever you call incx a binding reference is made to x which is used in add_10 function.

So let see how under the hood these variable reference are maintained

  • Function attributes func_closure in python < 3.X or closure in python > 3. X save the these references to these variable or also called as free variable. Let see how to access these values.
# Taking same example for the above code
def inc_x(x):  
    def add_10(): 
        print("{0} is increased by 10 = {1}".format(x, x+10)) 
    return add_10

add_10 = inc_x(30)

add_10()
# Output: 30 is increased by 10 = 40

# Checking whether it is Closure or not.

'__closure__'  in  dir(add\_10)

# Output: True

# Getting the free variable value from closure.

add_10.__closure__[0].cell_contents 

# Output: 30

While talking about the closure we also heard the term free variables which is also an interesting topic to discuss, which I will cover in the next blog post, till then

Cheers !! :)
Happy Learning

Today go through the commands to monitor processes and how to handle them

  • ps – It reports the snapshot of the current process
  • init- It the parent process of all the processes.
  • pstree – Same as ps but list the process in form of tree with more details.
  • top- List down all the process running, update the snapshot after a while.
  • Kill – it signals the process
    • INT – 2 -Interrupt, stop running
    • TERM – 15 – ask a process to exit gracefully
    • KILL – 9 – force the process to stop running
    • TSTP – 18 – request the process to stop temporarily
    • HUP – 1 – Hang up
  • nice – Every process run has priority and with nice we can control this priority, it ranges from +19(very nice) to -20(not very nice) decreased niceness higher the priority
  • renice- change the priority of the existing process

>> top
PID  User  PR  NI  VIRT     RES     SHR     S  %CPU %MEM Time+ Command
3911 user  20   0 2855988 206872 141304 S  72.2  2.6   7:15.09 Web Content                                                                       
31980 user  20   0 3703988 509176 188188 S  33.3  6.3  49:36.10 firefox                                                                           
 2839 user  20   0 2834092 191744 128268 S  27.8  2.4  16:13.39 Web Content    

>>ps
  PID TTY          TIME CMD
 2418 pts/2    00:00:00 zsh
 4318 pts/2    00:00:00 ps

>> pstree | less
systemd-+-NetworkManager-+-dhclient
        |                |-dnsmasq---dnsmasq
        |                |-{gdbus}
        |                `-{gmain}
        |-accounts-daemon-+-{gdbus}
        |                 `-{gmain}
        |-acpid
        |-agetty
        |-apache2---2*[apache2---26*[{apache2}]]
        |-at-spi-bus-laun-+-{dconf worker}
        |                 |-{gdbus}
        |                 `-{gmain}
...
>> nice -n 10 long-running-command &
>>renice 20 2984
>>renice 15 -u mike # changing  niceness for all process of mike user
>> kill -9 PID

#shell #dgplug #ilugc

Today was the day with the commands grep and sed.

  • grep – command used for the patter matching it have many useful options

    • -i: to make case-insensitive search
    • -r: search through the file in dire recursively
    • – l: print the name of the file with matching string
    • -c: print the counts of match
    • -n: numbers the matching lines in the output
    • -v: it's like not condition, print the reverse of the condition
  • sed – its read the input lines, run script on them, and writes them to stdout. This command is good for the string replacement and editing of the files.

Both these commands can be used with regex for the pattern matching.


>> grep -nv  ^# \| ^$  /etc/services |less
# will list all the lines from the file with do not start with *#* and ends with an empty line.

>>sed ``s/UNIX/LINUX` file.txt

# sed command will replace the occurrence of the *UNIX* word with the *LINUX*

#shellrun #dgplug #ilugc

Today was the day of basic File Management, Pipes, and Redirects. So let's jump to the command's

  • mkdir – create a directory for you, -p will create the parent directory if it does not exist.
  • rmdir – remove the empty directory
  • rm – remove the files and directory with -r.
  • pushd & popd – this one is the new command I came across, it let you save the previous command and you can pop that command with popd when you require. Dirs let you list down the directories you can pop back too.
  • file – tells you about the format of the file
  • ?, * – these are the wildcards which help in pattern matching, '*' for any number of character and whereas ? for only one character
  • | – called as pipe, it takes the output of one program and gives as an input to another program
  • Redirection (<, >) – < this indicates to file to read input from, > this indicates the file to write output to.
  • >> – Appends the output to the end of the file, If the file does not exist it creates a new one.
  • File Descriptors – Standard Input(0), Standard Output (1), Standard Error (2), make sure to check the example below to see how you can use them
  • xargs- it read a text and pass them as input to the following command
  • tee – is a combination of > and | and let you copy data from the input to the output or a file

Now let see these commands in action


>> mkdir -p chess/pieces/board # create an directory for you.
>> rmdir -p chess/pieces/board # will delete whole path if no other file or dir exist
>> pushd /media/USB # will let you save this path
... # any command you run b/w
>> popd # this will get you back to the pushed path
>> dirs # list all the dir path saved
~/bash-trail ~ / ~/Code/tranzact ~/bash-trail/program

>> file shopping_list 
shopping_list: ASCII text

>> whoami | rev # will reverse the output from the *whoami* output
keepdnas

>> last > last-login.txt # will save the output of login user to the file

>> wc < last-login.txt # will pass the text from the file as input to the *wc* command
>> program 2> file # will write the Standard error from the program to the file. **File Descriptor**

>> find /media/USB | xargs -l 3 rm -f  # this will pass files for USB dir and xargs will pass the 3 filenames at a time to remove them.

>> last | tee everyone.txt | grep bob > bob.txt
#  To save details of everyone’s logins and save Bob’s in files also.

#shellrun #dgplug #ilugc

Today run through the commands to process the Text streams from the shell.

  • less – command let you show less content from the file you are viewing.
  • sort – helps you sort the output, -f let you do sort case-insensitive and -n numerical sort.
  • cut – help to select the fields(-f)/character(-c)
  • fmt – format the output of the file, you can specify the width with -w
  • tac – similar to the cat command but in reverse
  • sed- this command use to process each line of file with a script

let see these command in action


>> less hello.txt
Hello World
THis is a text file
hello.txt (END)

>> cat shopping_list 
cucumber
bread
fish fingers

>> sort shopping_list         
bread
cucumber
fish fingers

>>date
Thu Jul  9 00:21:17 IST 2020

>>date | cut -d " " -f1
Thu

>>cat COPYING |  less  
The GNU General Public License is a free, copyleft license for
software and other kinds of works.

  The licenses for most software and other practical works are designed

>> cat COPYING |  less  | fmt -w 30
The GNU General Public
  License does not permit
  incorporating your program

>>cat copybump.py
#! /usr/bin/env python3

import datetime
import os
import re
import stat
import sys
...
if __name__ == '__main__':
    do_walk()

>> tac copybump.py
    do_walk()
if __name__ == '__main__':
...
import sys
import stat
import re
import os
import datetime

#! /usr/bin/env python3

>> sed -f spelling.sed < report.txt > corrected.txt # correct the spellling mistake in report.txt and output the correct text in corrected.txt

#shellrun #dgplug #ilugc