dgplug member blogs

Reader

Read the latest posts from dgplug member blogs.

from Stories of raydeeam

As I said learning is never easy. At least for me. When I first started learning Python from youtube back in my college, Every time tutorials starts with Variables, Operators and Expressions. I thought it's more like C/C++ and then I used to pause the tutorial and procrastinate. I procrastinate so much that I procrastinate the actual procrastination.

Well later I realized that I've wasted the time. But then I've started again and this time through docs. Yes from PYM book and blogs. I think docs gave me a better picture. I'm still learning. It's not that thing that you can complete within a week. Better things take time. Here are few things for beginners who is getting started with Python.

Whitespaces and indentation:

Whitespace and indentation in Python is important. Whitespace in the beginning of the line called indentation. For wrong indentation Python throws an error. Example:

>>> a=10
>>>    b=20
  File "<stdin>", line 1
    b=20
    ^
IndentationError: unexpected indent

There are more places where we should be following the same type of whitespace rules:

  • Add a space after “,” in dicts, lists, tuples, and argument lists and after “:” in dicts.
  • Spaces around assignments and comparisons (except in argument list)
  • No spaces just inside parentheses.

Comments:

Comments are simple English to explain what this code does. It's easier to understand your code if you follow proper commenting for every code snippets. Comment line starts with # and everything after is considered as a comment. Example:

#This is a comment
a = 10
b=20
#This line will add two numbers
a+b

Multi Line Comments:

#This is a comment
#written in
#more than just one line
print("Hey there")

or we can add a multiline string (triple quotes) in our code, and place our comment inside it.

'''
This is a comment
written in
more than just one line
'''
print("Hey there") 

Modules:

Consider a module to be the same as a code library. A file containing a set of functions you want to include in your application. To create a module just save the code you want in a file with the file extension .py To use a module you have to import it first. Example:

>>> import math
>>> math.sqrt(16)
4.0

Keywords and Identifiers:

Following identifiers are used as a keywords and these can not be used as an ordinary identifiers. False class finally is return None continue for lambda try True def from nonlocal while and del global not with as elif if or yield assert else import pass break except in raise

In Python we don’t specify what kind of data we are going to put in a variable. So you can directly write abc = 1 and abc will become an integer datatype. If you write abc = 1.0 abc will become of floating type. Example:

>>> a=10
>>> b=20.0
>>> type(a)
<type 'int'>
>>> type(b)
<type 'float'>

From the above example you can understand that to declare a variable in Python , what you need is just to type the name and the value. Python can also manipulate strings They can be enclosed in single quotes or double quotes like:

>>> 'Python is not a snake'
'Python is not a snake'
>>> "Python is a programming language"
'Python is a programming language'

Input from Keyboard:

Generally the real life Python codes do not need to read input from the keyboard. In Python we use input function to do input.

$ vim hello.py

number = int(input("Enter an integer: "))
if number < 100:
    print("Your number is smaller than 100")
else:
    print("Your number is greater than 100")

Output:

$ ./hello.py
Enter an integer: 229
Your number is greater than 100
$ ./hello.py
Enter an integer: 1
Your number is smaller than 100

Multiple assignments in a single line:

We can assign values to multiple variables in a single line:

>>> i, j = 100, 200
>>> a
100
>>> b
200

Operators and Expressions:

Operators are used to perform operations on variables and values. Python provides few operators which are below listed:

  • Arithmetic operators
  • Assignment operators
  • Comparison operators
  • Logical operators
  • Identity operators
  • Membership operators
  • Bitwise operators

Arithmetic operator:

Arithmetic operators are used with numeric values to perform common mathematical operations:

>>> x=10
>>> y=10
>>> x+y #Addition
20
>>> x-y #Subtraction
0
>>> x*y #Multiplication
100
>>> x/y #Division
1.0
>>> x%y #Modulus
0
>>> x**y #Exponentiation
10000000000
>>> x//y #Floor division
1

Assignment operator:

Assignment operators are used to assign values to variables:

>>> x = 5
>>> x += 5
>>> x -= 5
>>> x *= 5
>>> x /= 5
Comparison operator:

Comparison operators are used to compare two values:

>>> x == y
>>> x != y
>>> x > y
>>> x < y
>>> x >= y
>>> x<= y

Logical operator:

and #Returns True if both statements are true
or #Returns True if one of the statements is true
not #Reverse the result, returns False if the result is true

Identity operator:

is #Returns true if both variables are the same object
is not #Returns true if both variables are not the same object

Membership operator:

in #Returns True if a sequence with the specified value is present in the object
not in #Returns True if a sequence with the specified value is not present in the object

Bitwise operator:

& #AND- Sets each bit to 1 if both bits are 1
| #OR- Sets each bit to 1 if one of two bits is 1
^ #XOR- Sets each bit to 1 if only one of two bits is 1
~ #NOR- Inverts all the bits
<< #Zero fill lest shift (Shift left by pushing zeros in from the right and let the leftmost bits fall off)
>> #Signed fill right shift (Shift right by pushing copies of the leftmost bit in from the left, and let the rightmost bits fall off)

 
Read more...

from Stories of raydeeam

This will guide you through making a pull request to a Git repository through the terminal so that you can make your life easier while working on a project.

How it works:

1. A developer creates the feature in a dedicated branch in their local repo. 2. The developer pushes the branch to a public GitHub repository. 3. The developer files a pull request 4. The rest of the team reviews the code, discusses it, and alters it. 5. The project maintainer merges the feature into the official repository and closes the pull request.

Fork a Repository:

To create a pull request you need to have made your code changes on a separate branch or forked repository. To fork a repository you need to open the repository and click on the fork button. You'll get a copy of the repository after fork. You can work with forked repository made your code changes then create a PR.

Clone the Repository:

To make your own local copy of the repository you would like to contribute to, let's fire up the terminal. We'll use git clone command with the URL that points to your fork of the repository.

$ git clone https://github.com/username/repository.git

Create a Branch:

To avoid trouble later, let's create a new branch in our repo so that the work you'll do is sorted separately.

$ git checkout -b [branch-name]

This command will create a new branch in your repo and switch to it.

Make changes locally:

This is where you'll add your features. If you create a new file remember to add it with git add command and commit them by git commit -m

$ git add [file-name] $ git commit -m [commit-message]

At this point you can use git push command to push the changes to the current branch of your forked repo.

$ git push origin [new-branch]

Make the Pull Request:

This is the most simple step if till now you've done correctly. Now click on the New pull request button in your forked repo. Write down a nice report explaining why these changes should be included in the official source of your project and then confirm. Project author will get a notification that you submitted a PR. They will review your code and you'll get notification for their further actions. They may reject your PR or they may suggest something for changes. Go back, edit it and push again. PR will be automatically updated. If the maintainer is want to integrate your contributions to the project, the maintainer have to click Merge and your code will become a part of the original repo.


Read more...

from abbisk

I was thinking to note down my thoughts so that I can share my experience. So here it is, about how I joined 'dgplug' and get to know about Open-Source.

During my B.Tech 3rd semester somehow I got to know about the word 'Open-Source'. After a year when I was a fifth semester student, I met 'Ratnadeep(rtnpro)' in a tech-talk at my college,talk was over Open-Source , Its opportunities and freedom.Open Source culture was a myth in my college, very few people knew about Open-Source and its freedom of learning. In my batch, hardly fifty percent people know about Open-Source and Communities. During the talk 'Ratnadeep debnath(rtnpro)' mentioned about 'dgplug' summer training program and also told about 'Kushal das(kushal)' and other 'dgplug' operators, in those days I was learning python so after the talk a name was coming again and again in my mind that was 'Kushal das(kushal)', there were many questions and doubts were in my mind e.g. how to start, where to start then I decided to ping 'Ratnadeep debnath(rtnpro)' and he helped me a lot. I was a hindi background student till my 12th standard so I was a little bit shy to talk ans also I was a window user in those days then 'Ratnadeep debnath(rtnpro)' suggested me to shift over fedora, and also suggest to join IRC to get enrolled in 'dgplug' where masterminds like Kushal, Ratnadeep(rtnpro), Sayan, Chandan , Jasonbraganza were there. Summer training program had been started 15 days before i joined. 'Kushal das' suggested me to go through the logs, I did that. Kushal das(kushal) provided his book for python named 'Python you and me', book helped me a lot to understand python with a decent practice. https://pymbook.readthedocs.io/en/latest/ I started digging more about Open-Source and i got my interests in it. At the beginning, after trying on my own, I lost hope because I was struggling to learn to contribute and thought that it's impossible ,I started staying on 'dgplug' after sessions and listened to people what they are taking and used to ask questions frequently whenever doubt appeared in my mind as time passed thing became easier, it's just start for me many thing to go. Jasonbraganza's sessions over reading and writing importance was amazing and encouraged me and many more to write, I am very much thankful to him for his kind help. That's how it all started for me.

 
Read more...

from nileshpatra

I have been using git from quite some time, but there are certain amazing things about git that I learnt just recently.

1. Blaming with git blame

git blame gives the commit hash, author and time for every line in a file. This can be used to know who are the people who have contributed to that particular code and the commit hash too! It can also help figure out who added a particular line in a project which broke it, and then go blame them :P

2. Rectifying via git commit —amend

Ever been in a hurry and made a spelling mistake? That's exactly what is command is for! This can change the commit message for the last commit. Just type git commit --amend that would open the file in the default terminal text editor. Change the message, save and quit, and done!

3. Squashing

Squash is not a command, but definitely a concept in itself. Imagine having changes in a file multiple times, which would make a lot of unnecessary commits. Now if any point of time, one needs to go back in history, doing that would be just plain painful with several commits cluttered. Squashing here comes to rescue! Squashing means convert related commits to one commit. It's nothing but a kind of interactive rebase. for last n commits you can do git rebase -i HEAD~n. Here's how it goes: squash1

This will open the commits in the default text editor. Instead of pick in front of commit, type squash for those commits you wish to squash.

file

Save and exit, you will get another file which asks the user to choose final commit messages. Type the appropriate message and delete other messages. Save an quit, it's squashed! \o/

4. Stashing

While working on projects, things are in a messy state and you want to switch branches for a bit to work on something else. Now, you do not want to commit things half done(you need to commit everything before switching). git stash comes to rescue! Stashing takes the current state of your working directory and pushes it onto a stack of unfinished changes. Now you can switch branches! You can also apply the unfinished changes any time with git stash apply

5. Tagging

Tagging is a feature in git. For every software there are releases, now imagine if a software is released and development team is working for the next release. Meanwhile, there is a bug report with severe priority. Now, hat needs to be fixed in the previous version! Remembering the last commit for each release is not a good idea. Git here offers the functionality! It has the ability to tag specific points in a repository’s history as being important(releases). There are five basic commands:

  • git tag – will list all the tags in the project.
  • git checkout <tag_version> – jumps to the repository's state with the particular tag version.
  • git tag -a <version> -m '<commit message> – creates a tag with the version number and commit message.
  • git tag -d <tag_name> – deletes the tag from the list
  • 'git push origin —tags` – pushes tags to the origin

6. Applying patches

A lot of open source work is done via mailing list. The kernel mailing list comes at the top of my head. A lot of commits are mailed as patches. These patches contain the diffs(git diff). They can be easily applied via git apply <filename>. Now the code can be tested with the patch applied.

7. Short git status

Git has a short status flag so you can see your changes in a more compact way. If you run git status -s or git status –short you get a more simplified output from the command. status-short The ?? indicates the file hasn't been staged. D indicates deleted file and there are a few other tags too.

8. Cloning can be done under a different name

You don't need to have a weird name that the upstream would have to your repository. You can always rename the directory while cloning. The syntax is: git clone <upstream URL> <directory name>

Git is indeed a wonderful tool in itself. There's so much to learn. Hope you enjoyed reading the blog, :)

 
Read more...

from nileshpatra

Ever wondered to get a GUI application from another machine get rendered onto yours? If not, Linux offers that to you :P Let's see how: First of all we shall discus some basic terminologies before moving ahead:

The display server

The display server is very similar to a web-server. So Imagine that you have an apache server. Now when a client requests a service, the server would send a few instructions accordingly to the client over http/https protocol. The client(which here is the web browser) will render those instructions and display the content requested. The display server in Linux works almost the same way. The server here interacts with the hardware (CPU) and sends instructions over a protocol known as the 'X' protocol. The latest version of the same is 11, and hence it's called X11.

X-Forwarding

Think what would happen if the display-server is on one machine and client on the other machine? Yes! that would render the graphical applications onto the client machine. That's is exactly what X-forwarding is – render the application on one machine while it runs on a different machine.

Okay, enough of terminologies, let's get to implementing it now.

On the server, configure /etc/ssh/sshd_config to contain the following:

X11Forwarding yes
X11DisplayOffset 10

These two are usually commented out, ensure that the sshd_config contains these. You may need to restart ssh for the changes to be picked up. You can run this if the ssh server doesn't pick that up and then restart the server:

cat /var/run/sshd.pid | xargs kill -1

Next, start ssh on both the machines. On Debian or Debian derivatives you can do so by doing:

sudo service ssh start

Now we will connect the client to the server. On the client machine type:

ssh -X <server name>@<server ip>

If you are facing trouble finding out ip, you can do so via:

nmcli -p device show

And it's done! You have SSH'd into the server machine. Now you can render GUI apps on the client machine, while it runs on the server.

firefox

Here's me rendering firefox on the client :D

 
Read more...

from ritik5049

Nowdays these two types of encryption methods are widely used. * Symmetric encryption * Asymmetric encryption

Symmetric Encryption

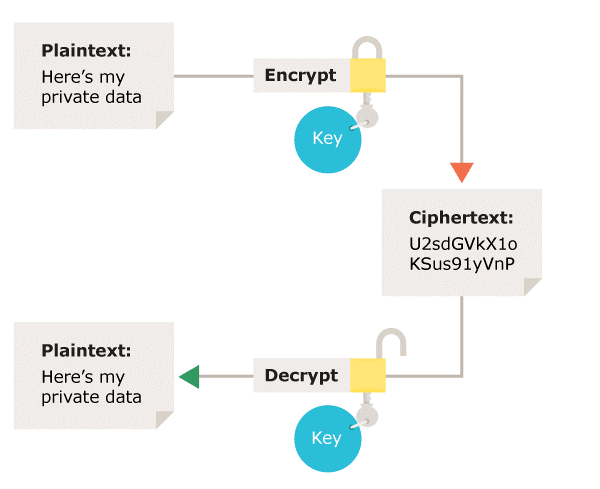
In symmetric encryption single key is used by both sender and receiver for encryption and decryption. Therefore both the parties have to exchange the key and thus trust issues arise here a lot. Some of symmetric key algorithms are DES(Data Encryption Standard), Triple DES, AES(Advanced Encryption Standard).

symmetric

Suppose there are two-person A and B, A wants to send his/her data from an insecure network to B. A will encrypt the data with key and B will have to decrypt it with the same key.

Asymmetric Encryption

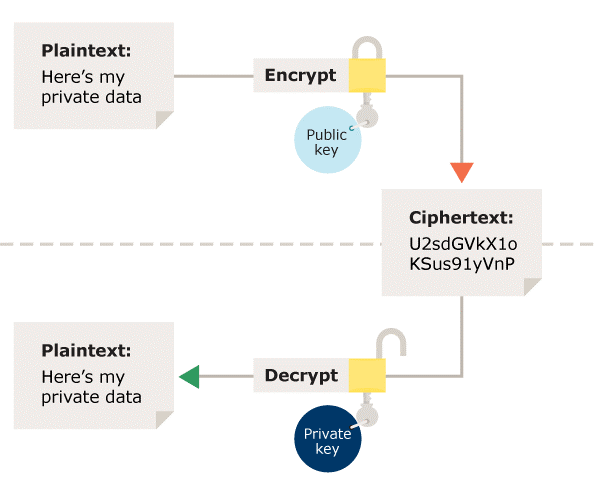
In asymmetric encryption pair of the key are used, one is called public key and the other is private key. The private key is kept secret by the owner and the public key is shared. Data encrypted with the recipient's public key can only be decrypted by the corresponding private key.

asymmetric

Suppose A wants to send data to B, so A must have B's public key to encrypt the data then B decrypt the same with his/her corresponding private key.

 
Read more...

from ritik5049

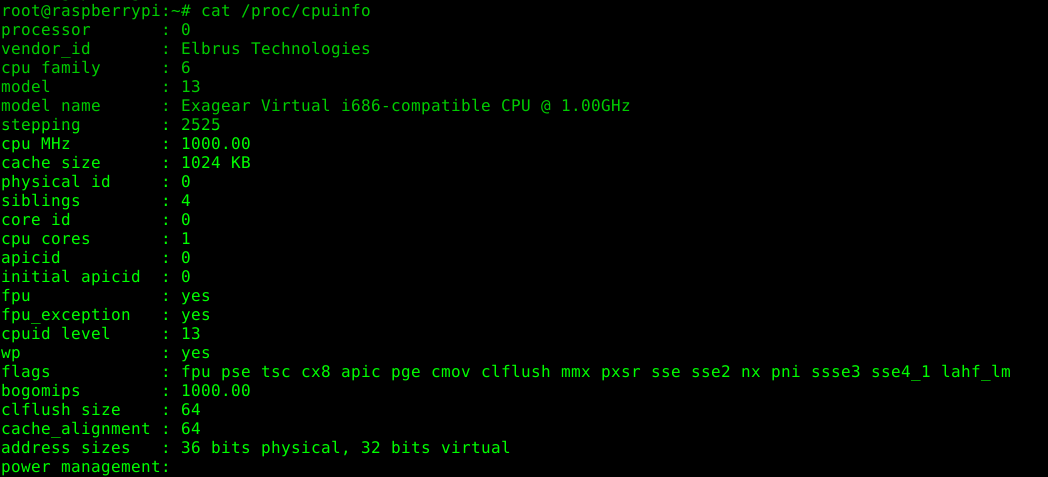
Hey everyone if you want to view information about CPU in Linux you can use the command cat /proc/cpuinfo in terminal it will display what type of processor your system is running and the number of CPUs present and much more. Here is an example. cpuinfo

 
Read more...

from ritik5049

Hello folks, my self Ritik Raushan. This is my first blog ever written by me. I`ll be going to publish much more technical kinds of stuff in upcoming posts. Here we will learn and grow together. See you again.

 
Read more...

from nileshpatra

I recently started interacting on #dgplug channel using my matrix ID and I’m also attending the dgplug summer training, in-turn learning a lot of new stuff. As all of us(dgplug summer trainees) were learning about mailing list etiquette and FOSS, we were suggested by mbuf (Shakthi Kannan) to go ahead and read his book ‘i want 2 do project. tell me wat 2 do.’ to get better insights for FOSS, mailing etiquette, how FOSS works etc.

The book then showed up at my door after a couple of days. This book presents valuable insights on open-source software and the equally important communication side related to it, which a newbie wouldn’t pay much attention to in the beginning.

The book starts with Mailing list etiquette and explains it in detail – it explains the importance of trimmed, ‘interleaved, bottom-posting’, not writing HTML mails, no overquoting , really well. It also made me realize how important adding additional details are. When I delved in further, I learnt about the tools that can be used for effective communication(mailing lists, IRC, SMS, Voice Calls) and when to use the right tool, with right people at the right time.

Next up, I learnt about the details for starting in open-source software development, how to effectively read README.md/important docs to proceed with the code-base. Then, in chapter-5, the whole process of creating a patch and e-mailing it is explained. A few days back I too had to merge a mailed patch to my repository so I could very well relate to the process of generating a patch via Version Control System(VCS) Tool and submit the patch via mail.

As I read further, I came across one of the most important take away from the book – Bug Triaging. It’s nothing but, reproducing the same bug from the mail/description and work upon it. It thus, also means that the mail/description should contain as much detail as possible for the debugging to be smooth.

The last three chapters focus on reading /writing, presentation and sustenance and have nice pointers to follow. The chapter-9 on presentation made me look back at the mistakes that I made while delivering talks at past meetups. I took a note of all the points that I missed so that I can deliver my next talk as perfectly as I can, 🙂

That’s about it. Thank you Shakthi Kannan , for this amazing book! Here's my photo with the book:

book_photo

 
Read more...